'LIKE' US

Your support means a lot to us. So if you like our posts and wish to keep reading articles on Control Your Mac, we request you to follow us on our Facebook and Twitter pages.

Showing posts with label mac. Show all posts

Video: How To Make Your Mac Display Black & White (Steps Included)

Infographic: how to make your Mac black & white (Click to enlarge)
Ever wanted a Black & White Mac? Probably not, but it never hurts to know how. And it makes for a great prank!

Here's how:

1. Head into System Preferences 〉 Accessibility 〉 Display
2. Check the box marked 'Use Grayscale'.


Subscribe and visit www.controlyourmac.com for more helpful apps, reviews, tips & tricks. Follow us on Facebook: http://facebook.com/controlyourmac


Video: How to Set / Change a Password on a Mac


Ever wondered how to set a password on your Mac to keep it from prying eyes ? Or maybe you just want to change / remove that pesky password you have right now. Watch this short video to learn how.


Steps:

1. Open System Preferences
2. Click on Users & Groups (May be called 'Accounts' in older versions of Mac OS X)
3. Select the desired user and click 'Change Password'
4. Enter your old password (Leave blank if there was no password)
5. Enter your new password and verify (Leave blank if you want to remove your password altogether)
6. Enter a password hint to help you remember
7. Click 'Change Password'

Quick Tip: Invert Screen Colors

Mac OS X Screen with Inverted Colors

Quick Keyboard Shortcut: Press. Command+Option+Control+8 together will invert the colors of your Mac screen.

If that fails, go to System Preferences > Accessibility > Display and check the box titled 'Invert Colors'.

Did that scare you ? Don't worry. It's completely reversible and completely harmless. Pressing the same keys simultaneously will revert the colors back to normal again. Alternatively, uncheck the 'Invert Colors' box to revert back to normal colors again.

Additional Tip: You can use this when in Photo Booth on Mac to avoid the blinding white-screen flash that comes every time you take a photo.

Safari Push Notifications on OS X Mavericks

Safari Push Notifications on OS X Mavericks

OS X Mavericks includes a great new feature to receive push notifications from websites. That's right. I said websites. I was pretty amazed when I heard about it back in June but I had absolutely no idea how they'd work. How would I choose which websites could send me these notifications. Would it be automatically based on my bookmarks and top sites? Or would the website have to add some sort of link from where I could enable push notifications. The integration of web and native features intrigued me. I figured the websites would have to add the option to send push notifications since it seemed like the only logical way to do this.

And so it is. As it turns out, when you visit websites (on Safari) which have enabled push notification, they automatically ask you if you'd like to receive push notifications from them. You simply have to choose to and they'll send them on their own even when Safari is not open. It's that simple.

I don't know of many websites apart from nytimes.com and nba.com that have enabled these yet but most websites seem to be quite eager to hop aboard and enable these soon.

To change your notification preference (for example, if a website sends annoying updates very often, you can always choose to disable it later by going into Safari Preferences > Notifications.

Setting Up iCloud

iCloud

Why iCloud ?

Why iCloud, you ask? Because it's awesome (not very radical but still awesome). iCloud keeps all  (well, most) of your data in sync between your iPad, iPhone, iPod and Mac. Create a new note on your iPad and see it on your Mac a few seconds later. Create a calendar event on your Mac and check it on your iPhone when you're on the go. iCloud keeps your Notes, Contacts, Calendars, Mail, Safari Bookmarks & Reading List, Pages Documents, Keynote Presentations, Numbers Files and even your Messages constantly in sync. iCloud even lets you keep Photo Streams so that any photo you take from your iPhone, iPod or iPad will automatically sync to all your devices. The possibilities are really endless. Let me give you a few examples of it's usefulness:

When you add something to your Reading List on your Mac, you probably want to 'read it later'. So you can read articles from your Mac reading list on your iPhone / iPad even when you're not at home. Similarly it also syncs bookmarks and even shows you which tabs are open on your other devices at any given time.

Another great example is Messages. You receive an iMessage on your phone number, right ? But with iCloud, even if someone sends you an iMessage on your phone number, you receive it on your Mac, iPhone and iPad at the same time and you can reply from any of these devices.

iCloud.com
iCloud also backs up all your contact, calendars, notes, iWork documents, etc on iCloud.com so that you can access them at any time from any device (including a PC!).

How to Set Up ?

The best way to set up iCloud is to create a new iCloud account (usually, someone@icloud.com) and then sign in from all your devices. Here's how to set up: http://www.apple.com/icloud/setup/ios.html

What's the Catch ?

Well, as of right now, the main problem with iCloud is that you only get 5GB of storage free when you sign up. Since Mail, Calendars, Contacts, Notes, Messages, etc don't take up much space, your storage need really depends on how much you'll be using Photo Stream, iWork and iTunes Match.

Follow Us

Follow Us on Twitter: twitter.com/controlyourmac
and on Facebook: facebook.com/controlyourmac

OS X Mavericks Makes Sending Messages Easier

Messages button in notification center on OS X Mavericks

If you are an iMessage user, you may already know that you can send and receive iMessages on your Mac. And now, with OS X Mavericks, it's even easier. Mavericks now includes an iMessage button in the Notification Center which allows you to quickly send an iMessage from your Mac without having to open the Messages application or take out your phone.

The Mavericks Notification Center also notifies you when the track changes in iTunes and provides you with a handy skip button right on the notification. Other changes in the Notification Center include website alerts, replying straight from the notification bubble and a cleaner look.

Stay tuned for more updates on OS X Mavericks, iOS 7 and other Apple news !

Follow us on Twitter: twitter.com/controlyourmac
and on Facebook: facebook.com/controlyourmac

Support Us Socially


If you like reading articles on Control Your Mac, we request you to follow our Facebook and Twitter pages.

Apple October 22nd Event Roundup - iPad, Mac and Apps


The Apple October 22nd event certainly was not hyped up nearly enough. Initially thought to be primarily an iPad event with a possible Macbook upgrade turned out to uncover an iPad so new that it needed a new name, 13-inch & 15-inch Macbook Pros with Retina Display, OS X Mavericks, A completely new iWork and iLife on both Mac and iOS (6 new apps!) and completely revolutionised  software pricing.

iPad

Two new iPads were launched on October 22nd: iPad Air and iPad Mini with Retina Display.


As rumoured, iPad Air takes on an iPad Mini-esque design with narrower bezels and a flatter back while retaining it's 9.7-inch retina display screen. It's thinner, lighter, sturdier and despite it, doesn't compromise on performance or battery: the new name certainly is justified. iPad Air includes a new Apple A7 chip with 64-bit architecture, delivering "killer" performance. iPad Air delivers improved WiFi performance, up to twice than of its predecessor due to the two antennas and MIMO technology. Surprisingly, there was no Touch ID sensor on any of the newly released devices. 
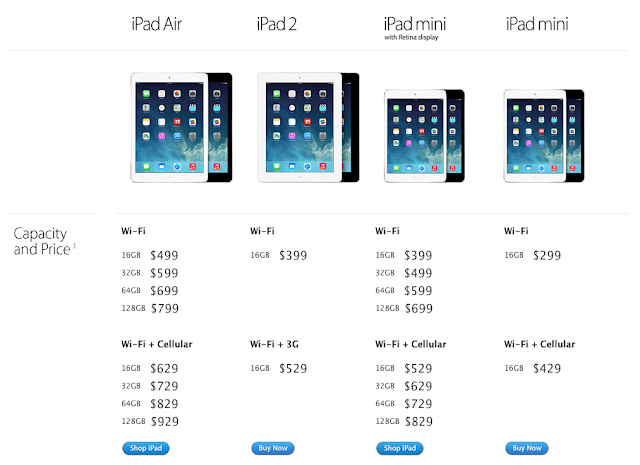
iPad Lineup with prices. Click to enlarge.
iPad Air retains the $499 price tag of previous 9.7-inch iPad Models while the iPad Mini with retina display gets a price tag of $399. The iPad 2 is still available - now at $399 - for those who want a cheaper but full-sized iPad. The original iPad Mini too remains in the lineup at $299.

Mac


OS X Mavericks (10.9) was launched for all Macs which were able to upgrade to OS X Mountain Lion and, breaking the conventional OS X upgrades pricing structure, it was made completely free for everyone who had OS X Snow Leopard or above. Mavericks is Apple's latest Operating System upgrade for Mac and amongst its top features are iBooks and Maps apps, a greatly improved Finder with tabbed windows and tags, and iCloud keychain.


The Macbook Pro lineup received a handsome upgrade with new Intel Iris graphics, faster Flash storage, improved battery life, faster WiFi, Retina Display on both 13-inch and 15-inch models among other things. The Macbook Pros were also given a new design making them (surprise, surprise!) slimmer and lighter.
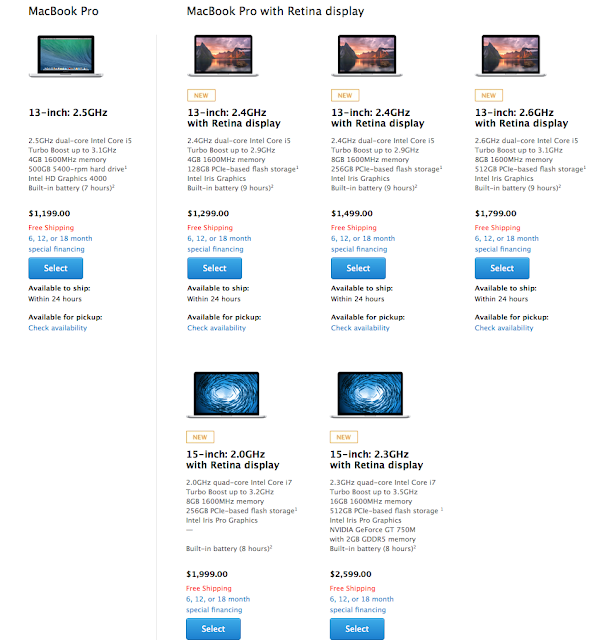

Macbook Pro Lineup with Prices. Click to enlarge.

The 13-inch non-retina display Macbook Pro still remains in the lineup (only one variant) at $1,199 and 13-inch retina display models are available at $1,299, $1,499 and $1,799. 
The 15-inch retina display models models are priced at $1,999 and $2,599 and the 15-inch non-retina display Macbook Pro is no longer available.

Apps


A new suite of iWork (Pages, Numbers and Keynote) and iLife (iPhoto, iMovie and Garage Band) was released on October 22nd for both Mac and iOS. The new apps are beautifully designed, hold some great new features and best of all, are available for free with every new Mac or iOS device.

Possibly the greatest addition to iWork apps is the collaboration feature which allows you to share a document with anyone and allow them to work on the document simultaneously. They don't need a Mac, an iOS device or even an iCloud ID. It works just as well with a windows through a web browser.

iLife apps include some great new features too such as 'Theatre' in iMovie and Drummer in Garage Band. If you already have iLife or iWork apps on your Mac, iPhone or iPad, you can update them for free from the App Stores. If not, they're free with with all new devices.

Apple October 22nd Event - iPads, MacBooks, Apple TV and a Surprise ?

Invitation for September 22nd event
Apple's keynote media event begins at 10 A.M Pacific Time / 1 P.M Eastern Time on October 22nd, 2013. Just a few hours away. 

If rumour is to be believed (and rumours have been reliable in the past), the event will unveil an iPad 5, a new 9.7 inch (standard-sized) iPad which will feature a design that takes after that of the iPad Mini. 

An iPad Mini 2 is also supposed to be released with retina display and new colour variants: space grey and gold. Apple may also release new smart covers, as hinted in the invitation.

A new line of Macbook Pros with Intel Haswell CPUs, 802.11ac, better battery life and other similar upgrades can be expected. This would be coherent with previous Macbook Air upgrades. A Haswell Mac Mini upgrade might also be seen although there's little news on that front.

OS X Mavericks, which was announced in June, will likely be talked about in a little more detail and a release date for it announced. A Mac Pro upgrade, which has been due since 2010, is also likely although technically that could happen anytime before December 21st. Even so, we can expect some more details on the Mac Pro to be clarified today.

Apple's Keynote Event (September 12th 2012) - Video


Apple's iPhone 5 launch held a great store of surprises right from the details of the iPhone 5 to the launch of the new iPod lineup. You can watch the actual keynote event here: http://www.apple.com/apple-events/september-2012/

Get Rid of Viruses and Mac Malware


 A lot of people consider the Apple products to be the safest ones in the world, but just like any other device, gadget or software, they can be hacked when connected to the Internet. The Apple gadgets came as sophisticated items no one could get in. Years ago, unlocking an iPhone was impossible. Today, a lot of people do it. The same goes for Mac OS, which came out as a solid and impressive operating system, but it took Apple a couple of years to realize that it required some protection.

Compared to other operating systems, the number of harmful applications is insignificant. With a little over three hundred malicious scripts, they cannot compete with the one million viruses for Windows.

However, you are still exposed to some risks, and although many of these malicious codes are demonstrative and developed as concepts, there are others who can entirely ruin you. When your online banking session is intercepted and hackers take advantage of your bank account, you will realize how important an antivirus is. When all the Mac systems in your office get hacked and your entire network is compromised, getting an antivirus is a priority once you clean your computers. Therefore, nothing can be fully protected. A good hacker can step inside your computer, but in order to prevent it from happening, you need protection.

How malicious software can enter your Mac:

There are a multitude of myths and facts around the Mac systems. The claims vary widely from one expert to another, but some ideas are common and general. For instance, the malware scripts use the same operating principles and tricks the Windows viruses use. Or, you can get a virus by checking out a website. You don't even know when it gets automatically installed and run. Some websites hide scripts for Windows, while others attack Mac exclusively. You may think it is safe to download particular programs for online live streaming, for example. Are you sure the software is safe? What if it downloads other components from different servers?

Some applications get inside your computer as your fault. Sometimes, you download a software only to be able to see a video of your favorite celebrity naked or to crack a particular program. When you upgrade your computer to play a free game, hack the registration process of a program or see a video, you have no clue what hides behind them. Some other programs are different though. They are harder to observe, since they are included in source codes and they are run as soon as you load a particular website.

Being safe requires loading trustful and safe websites only, but also refusing any files from people who are not among your friends. Even your friends may send infected files too, without even being aware of it.

So, what's the solution?

There are definitely some unwritten rules for a safe experience over the Internet, but since you are not always in control of your experience, an antivirus or a security package is a necessity. The Mac OS may be among the safest in the world, but it can still be penetrated pretty easily by hackers. From many points of view, the safety of your information, data and secrets depends on you only. You need some education and the right software.

About the Author


Robert Woods writes about different tech-related subjects including Apple products and Mac security. You could visit some of his articles at "www.antivirusformac.org"

Re-Weaving Notification Center


Is Notification Center too dull for you ? Of course it is. The much-overused grey linen background is far too dull and looking at it everywhere doesn't really help. But that can always be changed. To anything you want. (Not necessarily to the funky background above) How ?

Weave your Non-Linen Background

  • Find the image you want to replace the background with. Now open the image in preview and go to File --> Export and export it to your desktop as a tiff file titled "linen.tiff".
  • Remember that for best results, the image you choose should be repeating and of size 256x256 for a normal mac display and 512x512 for a retina display.
  • You need not (and should notuse some

Tear up the Linen

  • Open Macintosh HD/System/Library/Core Services
  • Now locate the file called "Notification Center", right-click (or control click) and select "Show Package Contents"
  • Then go to Contents/Resources and locate the file titled "linen". It'll be a TIFF file and depending on your preferences, the extension may or may not be visible. 
  • Copy the "linen.tiff" file and store it somewhere safe. (I left it in the same folder and titled it "linen copy.tiff")
  • Drag and drop the "linen.tiff" file on your desktop into this folder replacing the older file of the same name. You may need to authenticate the transfer using an administrator's username and password.

Relaunch!

  • Now open the "Activity Monitor" application (either by locating it in Applications/Utilities or by searching for it in Launchpad) and find the process titled "Notification Center".
  • Select the process and click on the "Quit process" button on the top left corner of the window.
  • The dull linen background of Notification Center should now have been replaced by the image of your choosing.

Subler: Media Utopia

Subler's Application Icon
"Style is an option but cleanliness is not"
If you're one of those people who loves to classify and organize their non-iTunes movies and Media, then you're in for a treat.
Subler is a neat little application which helps you to organize your media library and keep it... Well, neat and clean. Unlike the majority of applications in this niche, Subler is a no-nonsense application and doesn't require any particular expertise to use.

Subler in Action

When you've downloaded and installed this particularly useful free application, all you have to do is drag and drop your media file (Movie / TV Show) into the subler icon in your Dock and it loads right up.

As opposed to what one would expect from this application, Subler doesn't have tiny little slots or text fields for you to fill in metadata and information about the Movie (or TV Show). Instead, you simply click on a Search button on the top-righthand corner and almost always, Subler finds the right information for you. Subler then asks you to choose from a variety of DVD Covers (Artwork) for your file, all of which are the perfect dimensions. If however you prefer to have stills of the video instead of artwork, you need only click the "Load More Artwork" button enough times. 
Once you're done, click Okay and save your file (Command-S). In addition to its vast storehouse of features, Subler also allows you to choose what format you'd like to save your app in (MP4 and the likes). I usually drag the saved file straight into iTunes after that for its visual appeal and organizational abilities. That's pretty much everything there is to know about how Subler works. Nifty, huh ?

Why it's so useful

Subler is an app which gives truth to the statement "it's the little things that count." Aside from being able to perform the aforementioned tasks of organizing, beautifying and adding information to your files, Subler is also particularly adept at:

  • Incorporating Subtitle Files into the Media File without needing additional subtitle files.
  • Finding Movies and TV Shows and their information to add to your Media File.
  • Adding Chapter Marks to your file.
  • Exporting Chapter marks and subtitles back to separate .txt and .srt files.
  • Adding Artwork to your files. (Amazing!)
  • Classifying your file as a Movie, TV Show, Podcast, etc.
  • Classifying your file as 1080p, 720p, etc.
The Shortcomings

I'd be hard-pressed to find any drawbacks in Subler but for it's lack of batch-processing capabilities. Still, it's not a deal breaker for me.

Cost, Rating and Alternatives

Cost: Don't take out your wallets just yet. Subler is a completely free application for Mac OS X Lion with no catch to it, although they do appreciate donations.

Alternatives: A great alternative to Subler is Plex (Media Server and Media Center). However it never really worked for me, since it downloaded the artwork, metadata and background images only within the application and didn't save the data to my Media files.

Rating: 9/10 With an app like this, there's really no chance of it getting anything less.

WWDC '12 Brings Even More to OS X Mountain Lion

Aside from the prominent announcements of iOS 6 and the new Macbook lineup, Apple also revealed some plans they have for the latest version of Mac OS X: Mountain Lion (10.8)

Mountain Lion, which is scheduled to ship in July (via the App Store for around $20) already included some of the features announced yesterday (Messages, Reminders, Airplay Mirroring, etc). However, Apple did announce some new features that were released with Mountain Lion DP4 which many people do not know about. Among these features are Power Nap and Dictation which I've already written about, but there are some of these I forgot to mention:

Safari 


Mountain Lion comes with a new version of Safari which apparently has the fastest javascript engine among all known browsers. It also includes a unified URL and Google Search bar similar to that of Google Chrome. Apple has once again declared this bar "smart". ML's Safari is also far better looking than it's antecedent and has new tabs that are smooth and visually appealing. Apparently, you can also scroll through tabs while seeing what's on them. (as shown above)


Facebook Integration


Facebook will be integrated throughout the OS, similar to how Twitter was on ML and very similar to how facebook integration will be on iOS 6. You can now post to Facebook from almost any inbuilt application on Mac OS X, view you Facebook notifications in notification center and even post directly to Facebook from notification center.


New notification center icon


Another noticeable difference (although very minor) is that the menubar icon for notification center has changed from a tiny circular blob (in the old DP) to a few protruding bars (in the new DP)

Dictation and Power Mac Come to the Mac (Without Siri)


Dictation on Mac

Alas, Siri didn't make it to Mac OS X Mountain Lion. Still, they had to leave something for next time, didn't they ? Dictation, however, did manage to crawl it's way up to OS X.

Dictation is fundamentally what the name suggests: It allows you to speak what you want your Mac to type. And the best part is, it works throughout your Mac through a simple keyboard combination (Possibly command-command). Press it, and it allows you to speak anywhere you can type. Particularly useful for longer emails, word documents, etc. Only time will tell how useful and efficient it really is. You can punctuate with voice commands too and according to the Apple website, (screenshot above), it gets "smarter" the more you use it, learning voice characteristics and names. An omnipresent feature in the new iPad, Dictation seemed to be quite efficient on iOS.

Power Nap

Power Nap periodically updates your iCloud account with Notes, Mail, Contacts, Reminders, Photo Stream, Calendar, Find My Mac and Documents even when your Mac is asleep.
It also updates your software and backs up you Mac with Time Machine when connected to a power source, all done in utmost silence. You may not even know what's going on. So when you switch your Mac back on, it's already updated and ready.Seems fairly useful.


Subscribe to receive posts by email.

WWDC '12: The Shortcoming and the Disappointments


Apple's WWDC '12 Presentation just got over a few minutes back and although there was a great deal announced, which was, for the most part, very impressive, Apple still left a lot to be asked for.
  • Despite what rumors suggested, the entire Mac lineup did NOT get an upgrade. The notebook lineup, however, got a significant improvement as well as a new member: The Next-Generation Macbook Pro: 15.4 Inch, Retina Display)
  • iOS 6, albeit amazing, will NOT be supported on: The Original iPad, iPhone 3G or below, iPod Touch 3rd Generation or Below; Heartbreaking for owners of said devices but potentially very lucrative for Apple.
  • Mountain Lion starts shipping in July, not before that. Not a free update either. However, it's still cheaper than Lion's update was.
  • iOS 6 will not release till fall and only added one new application.
  • No Apple TV SDK as opposed to rumors which were widely thought to be confirmed.
  • No Siri on Mountain Lion, although Dictation was there
  • Mountain Lion's Unified Safari Bar didn't make it to iOS 6.
  • No new iTunes interface on Mac. Really need that!
  • Nothing groundbreaking. Nothing Apple.
Apparently, not everyone's since the original iPad doesn't get support for iOS 6

Black and White Mac (Video Tutorial)


Ever wanted to make your Mac black and white ? Even if not, it never hurts to know how. Short concise tutorial on how to make your Mac's screen B&W.

Either way, here's a step by step tutorial on how to do so. (Scroll down for the Video Tutorial)

Step by Step Tutorial (Text)


This tutorial is meant for users of Mac OS X Lion (10.7) but will work for users of older versions of Mac OS X too.
1. Open up System Preferences (Click on the Apple Button in the menubar on the top-left of your screen --> System Preferences)
2. Click on Universal Access (Under Personal)
3. In the Display panel, checkmark the box labeled 'Use grayscale'.
4. That's all there is to it! To turn your computer back to its usual bright and colorful state, simply uncheck the same box.

Step by Step Tutorial (Video)

Understanding a Mac Keyboard

Click to enlarge


At first sight, the Apple keyboard may look extremely perplexing to a ex-windows user. After all, where did the Start button vanish? The alt key? And what’s this new  ‘fn’ button? And there’s no number pad?!
Despite outward appearances, the Mac keyboard is actually almost exactly like a windows keyboard except for a few minor changes (marked above) -
1. The keys marked ‘1’ above represent the Command Key. The command key is very simple to understand. It is the primary key for most purposes. On older Macs, it was the apple key. It’s Mac’s version of the control key. In fact, if you knew any windows shortcuts, like control-p (to print), control-s (to save), etc, most of them can be similarly executed on the Mac by replacing ‘control’ with ‘command’. Example: command-p (to print), command-s (to save).
2. The keys marked ‘2’ above represent the Option Key option key is also known as the alt key and it replaces window’s alt key.
3. The key marked ‘3’ above represents the Control Key. The control key usually functions in combination with the command key (or option key) in shortcuts.
4. The key marked ‘4’ in the above figure represents the fn key.
5. The key marked ‘5’ above represents the Shift Key which serves the same purpose as that in windows computers. (Capitalization, etc)
6. The key marked ‘6’ above represents the Escape Key (Esc)
7. The key marked ‘7’ above represents the Eject Key which (aside from being used in combinations with other modifier keys) can eject a CD from your Super Drive.
8. The key marked ‘8’ above represents the Return Key which serves the same function as the enter key on a windows. The return key may also be called the Enter Key.=
The Function Keys on top of your Mac’s keyboard (F1, F2, F3 and so on) have assigned functions straight out of the box. You can always change what function they perform but their pre-assigned functions are as follows.
Pre-Assigned Functions
F1 - Decrease Screen Brightness
F2 - Increase Screen Brightness
F3 - Mission Control (Lion onwards) / Exposé (Before Lion)
F4 - Launchpad (Lion onwards) / Dashboard  (Before Lion)
F5 - No Pre-Assigned Function
F6 - No Pre-Assigned Function
F7 - Previous Track (Or hold down to rewind within Track)
F8 - Play/Pause Current Track (If no track is open, pressing it once will open iTunes, pressing it a second time will play a track)
F9 - Next Track (Or hold down to forward within Track)
F10 - Mute Volume
F11 - Decrease Volume
F12  - Increase Volume
Follow Us

Follow Us on Twitter: twitter.com/controlyourmac
and on Facebook: facebook.com/controlyourmac

Fine-Tooth - Super Search Application (By CYM)

Fine-Tooth Super Searcher

How many times in a week do you need to find a file but don't have the time to sift through hundreds, maybe thousands of similarly named files. How many times in a day ? Sometimes, you may not even remember the name of the file. 
That's when Fine-Tooth comes in hand. It does most of the grunt work for you, searching through the hordes of files on your system and delivering just the handful that you need.
Fine-Tooth is a lightweight application that uses your Mac's inbuilt capabilities to find your files with supreme ease. Since it uses employs methods that your Mac is capable of straight out of the box, it is easy to use with no tedious installation process. Also because of the same, it doesn't eat up your hard drive's space.

What's so great about Fine-Tooth ?
  • In practice, both Fine-Tooth and Spotlight use some of the same processes to find your files. However, in contrast to what spotlight does, Fine-Tooth displays your search results in a neat Finder window without displaying any clunky application windows of its own.
  • Fine-Tooth combs through your entire hard-drive (and attached volumes) using processes that your Mac is already capable of. However, it simplifies the process to a bare minimum which requires no extensive knowledge.
  • It's a simple minimalist and lightweight application: Open, Search and you're done! Fine-Tooth even closes itself on its own for your convenience
  • As opposed to other search applications, Fine-Tooth simply uses your Mac's existing processes to find your applications and hence neither requires a complicated set-up nor does it ask you to select what to index.
  • Allows you to search by file name, kind, date added / modified and even where it was downloaded from.

Instructions regarding its usage:
  • When you open Fine-Tooth, you'll see a window asking you to choose how you would like to search: by file type, date or where from it was downloaded. Simply select one and type in the required.
  • Then type in the name or part of the name of the file. Leave blank if you want to see all results which fit the desired criteria.
Download Fine-Tooth here!


Requirement: Mac OS X

File Size: 117 KB

Developer: Shiv Sakhuja (CYM)

Are Macs Completely Free of Viruses (Virii) and Malware?

Unless you want your Apple to look like this, you might want to start taking better care of it


Most Mac users believe their Mac is a fortress, protected from all harmful computer malware, circulating around the internet. In fact, a number of Mac users don't even have any anti-virus software installed onto their systems. Although it pains me to say it, I am one such number.

Why are Macs Safer than PCs ? 

Although certain people may beg to differ, even a Mac OS X isn't completely impenetrable when it comes to computer Malware. So then why do people believe that Macs are completely free of harmful software ?

  • Firstly, Mac OS X is built on Unix thus making it a far safer operating system than Windows.
  • Secondly, there is very small number of softwares with detrimental effects for Mac. In comparison with those for windows, the number is almost negligible.
  • Thirdly, the majority on computer users function on Windows, hence making it a better target. Also, some software that developers use to make malware are directed towards affecting windows.
So is my Mac completely safe or do I need to run some anti-virus software ?

Once again, Macs aren't completely safe. While they are far safer than PCs, the possibility of malware infecting still exists, however minimal. So although it isn't essential, anti-virus softwares such as Norton Antivirus for Mac or iAntiVirus are always useful. However, backing up your important data is always a vital task, especially for serious users. Worms and Trojans too can be prevented by using preventive software.